Recovering the Seagate GoFlex Home
Hey guys this is a bit of a unusual post compared to usual, Recently i accidentally broke my Seagate Go Flex Home while i was installing ArchLinuxARM, After much research i found out a way to fix it using a “Serial Connection”. So here is how to recover a Seagate GoFlex Home via serial.
- Firstly you will have to take apart the base of your unit, To do this you need to peel off the rubber feet, and remove the 2 screws. Then pry the case off.
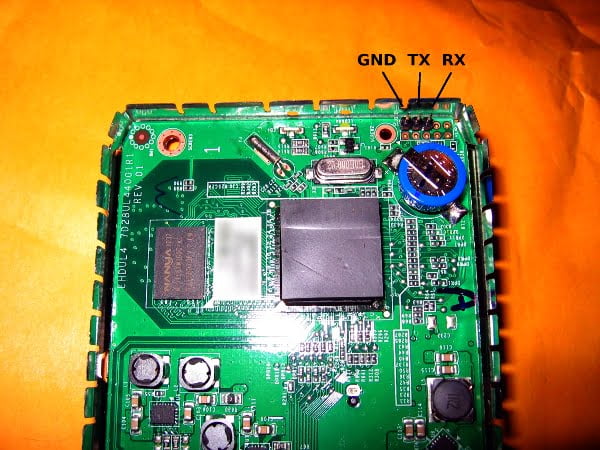
- You then need to solder 3 wires to the PCB of the unit.
- The order to solder them is GND,TX,RX from left to right as shown below

- You should have already worked out which wire is GND and that leaves you with 2 wires (RX and TX) you will need to guess which is which or use a multimeter. If your lucky you will get it first time.
- So now you should have a working serial connection and the Go Flex home output showing on the console window (once device is turned on) if not then check drivers and solder points for breaks.
- OK now for the software side of things, You will need to download this file (This is for Go Flex HOME and may or may not work on the Go Flex Net, Net users will have to find the .kwb file elsewhere.) and extract it to a folder.
- Next you will need to get the IP of your computer which will be running the TFTP Server (PumpKIN) (if you don’t know how then google it)
- Now we enter some commands in the unit (if you didn’t interupt boot then reboot the system and interupt the boot. (Replace the IP’s with IP’s appropiate for you)
setenv ipaddr 192.168.1.210 # Has to be in your ip range
setenv serverip 192.168.1.36 # IP address of your TFTP server (This computer) - Now that we have the TFTP setup, We need to run the previously extracted PumpKIN.exe
With both the .KWB and PumpKIN.exe in the same folder will now type the following in to the serial console window.tftpboot 0x800000 goflexhome.kwb - PumpKIN should pop up asking whether you want to grant access or not, Make sure to grant access.
Make sure the output says “Bytes transferred = 524288 (80000 hex)” then typenand erase 0x0 0x80000 - Make sure the output contains “OK” then
nand write.e 0x800000 0x0 0x80000 - Make sure the output contains “524288 bytes written: OK” then
reset - The goflex home should reboot and be back on stock firmware, If it still isn’t working then you can try the restore steps by Seagate. Or feel free to comment below and i will try my best to help.
